

Understanding Line Switching
Learn how to control which device sends each message using tags, switch commands, routing priority, and workflow patterns.
Control which device sends each message — permanently, temporarily, or automatically. WhatSnap gives you three tools: account tags for automatic routing, commands for manual overrides, and a priority hierarchy that ties it all together.
- At least two connected lines
- Familiarity with your line tags (visible in the WhatSnap Manager Lines tab)
Routing Priority
Before diving into specific tools, understand the hierarchy WhatSnap follows for every outbound message:
| Priority | Method | When It Applies |
|---|---|---|
| 1 (highest) | Command | You include a switch command in the message body |
| 2 | Contact tag | The GHL contact has a p2p-account tag |
| 3 | Incoming mirroring | Contact previously messaged a specific line — replies go back through that same line |
| 4 (fallback) | Default line | No command, no tag, no history — uses the line you set as default |
Commands always win. If nothing else is set, the default line handles it.
Routing and Your Telephony Provider
Tags and commands work the same whether P2P Messenger is your SMS provider or you run it side-by-side with LeadConnector. The provider setting only decides which messages reach WhatSnap in the first place:
| How the message reaches WhatSnap | Contact tag | #switch / #switch_unique |
|---|---|---|
| SMS tab or native Send SMS action, with P2P Messenger as the SMS provider | Yes | Yes |
| P2P Messenger channel in the conversation (any provider) | Yes | Yes |
| Webhook action (any provider) | Yes, unless account is set | No. Put the tag in the account parameter instead |
| SMS tab or native Send SMS action, with LeadConnector as the SMS provider | Message never reaches WhatSnap | Message never reaches WhatSnap |
You do not need to change the SMS provider for tag-based routing to work. If a tagged contact is not getting messages from the right Line, check that the message is actually reaching WhatSnap (P2P Messenger channel, P2P Messenger as provider, or a webhook) and that the Line is allocated to this subaccount.
Account Tags
Tags are the primary way to control routing automatically. When a GHL contact has a P2P account tag, every message to that contact routes through the matching device — no manual intervention needed.
Tag Format
Every connected line gets a unique tag that you define:
| Component | Value |
|---|---|
| Prefix | p2p-account- (always the same) |
| Name | Your choice — use something descriptive |
| Full example | p2p-account-sales-mark |
When you connect a line, you choose a name for the tag. WhatSnap automatically creates it in your GHL Agency tag list.
Assign a Tag to a Contact
Copy the tag
Open WhatSnap Manager → Lines tab. Copy the tag next to your target device.
Add to GHL contact
Open the contact in GHL → Tags field → paste the account tag.
Test it
Send a message. WhatSnap detects the tag and routes through the matching device.
Automate Tag Assignment
Use a GHL workflow action Add Contact Tag to assign tags automatically. Common triggers:
- Lead assigned to a specific salesperson
- Contact reaches a pipeline stage
- Inbound message received on a specific line
- Contact tagged with a geographic or language-based label
Tag Best Practices
- One account tag per contact. If a contact has two, WhatSnap uses the most recently added one.
- Clean up disconnected lines. If you permanently remove a device, delete its tag from GHL to prevent routing to a dead line.
- Use descriptive names. p2p-account-sales-mark is better than p2p-account-line2. You can edit names in WhatSnap Manager → Lines → three dots → Edit Tag.
Renaming a tag updates it for new contacts, but existing contacts keep the old tag. If you rename a line, audit your contacts and workflows.
Commands
Commands give you per-message control over line routing. When you include a command at the start of your message, WhatSnap:
- Reads the command to determine which line to use
- Strips the command before sending — the recipient never sees it
- Shows the full message (with command) in your GHL conversation for reference
Where to Use Commands
| Location | How It Works |
|---|---|
| GHL Conversation | Type directly in the SMS or P2P Messenger tab |
| Workflow SMS Action | Include in the message body of a Send SMS action |
| Tag/Custom Value Trigger | Create a workflow that sends a command-prefixed message when triggered |
| Webhook action | Commands are not read here. Use the account parameter — see Send Messages with Webhooks |
#switch — Permanent Reassignment
Changes the line assigned to this contact going forward. All future messages — and every subsequent SMS action in the workflow — route through the new device.
Example in a workflow SMS action:
#switch|p2p-account-sales-mark
Hey {{contact.first_name}}! This is Mark from Rockstar Agency.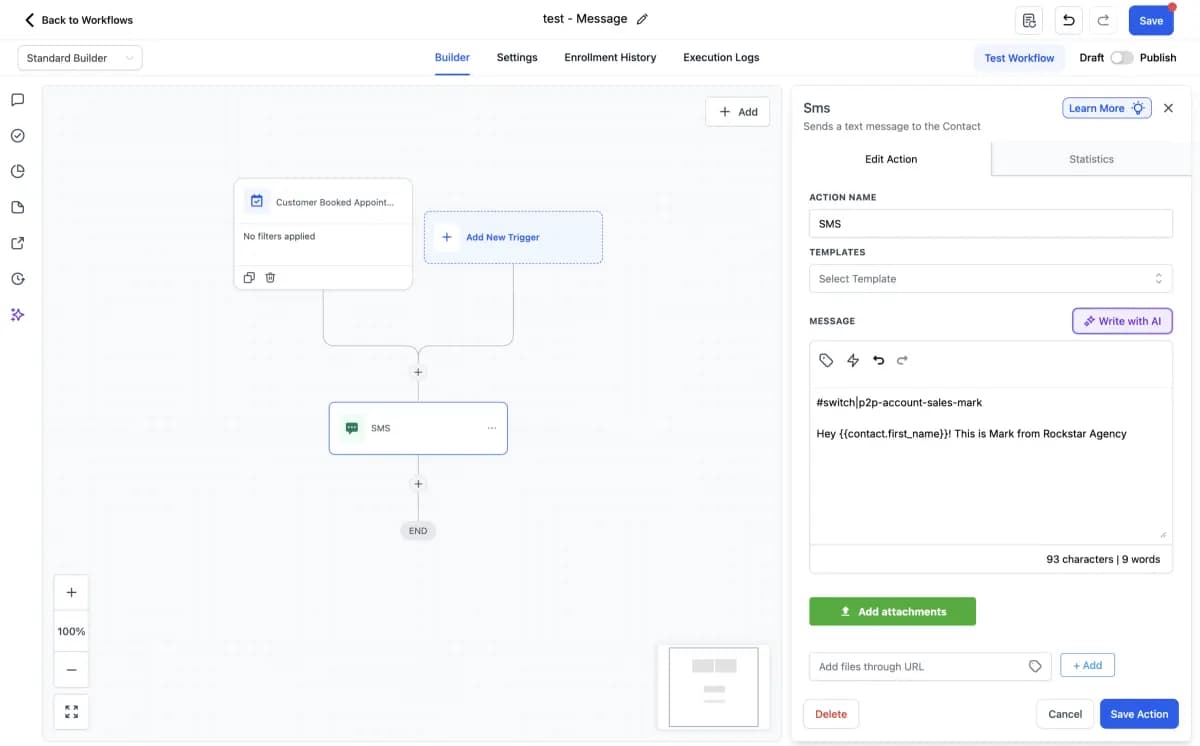
In this workflow, the Customer Booked Appointment trigger fires and the SMS action sends the message from Mark's line (p2p-account-sales-mark). Because it uses #switch, this contact is now permanently assigned to Mark's device — every future message will go through that line.
What the contact receives:
Hey John! This is Mark from Rockstar Agency.
The #switch command is invisible to them — but you'll see it in your GHL conversation.
#switch_unique — One-Time Override
Sends this specific message from a different line without changing the contact's permanent assignment. After this message, routing returns to whatever tag or default was active before.
Example:
#switch_unique|p2p-account-ceo
Hi {{contact.first_name}}, just wanted to personally thank you.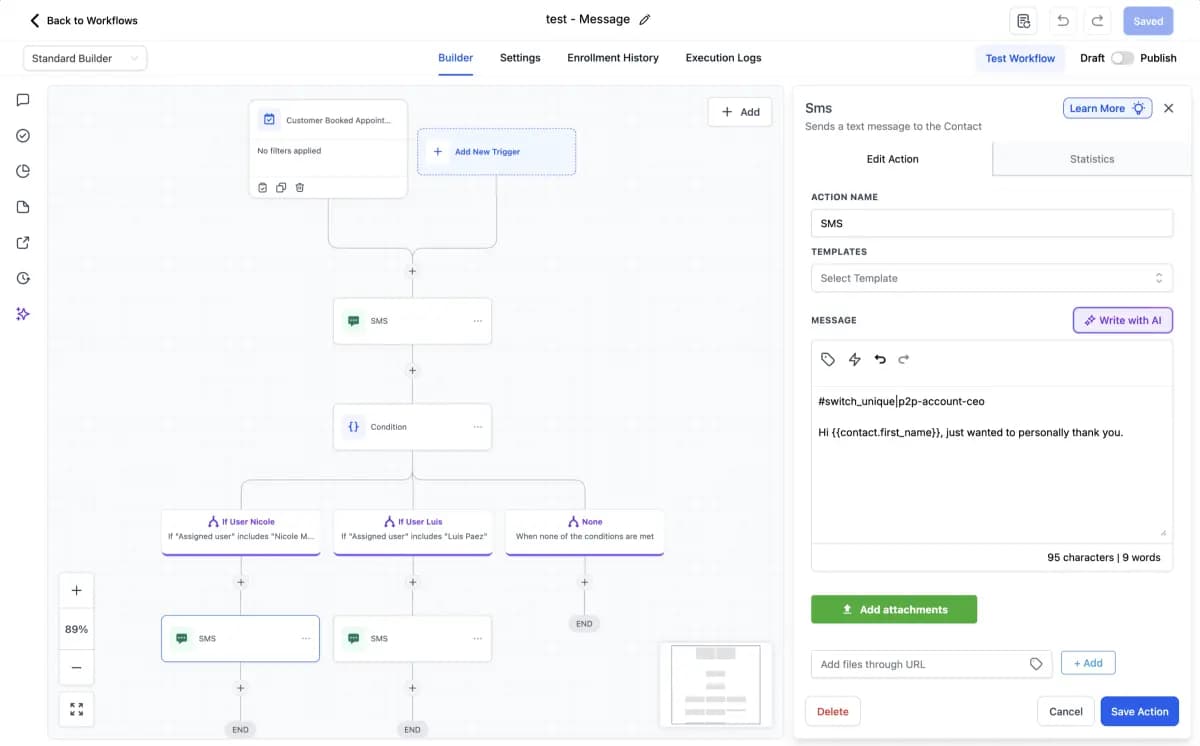
In this workflow, a Condition checks which user is assigned to the contact. If the assigned user is "Nicole M." (the CEO), the SMS action uses #switch_unique to send one message from Nicole's line (p2p-account-ceo). The contact's permanent line assignment stays unchanged — only this specific message goes through Nicole's device.
If you wanted Nicole's line to handle all future messages for this contact (not just this one), use #switch instead of #switch_unique. The difference: #switch permanently reassigns the contact, while #switch_unique is a one-time override.
Command Format
The command must follow this exact structure:
#switch|p2p-account-tagname
Your message here| Part | Description |
|---|---|
| #switch or #switch_unique | The command type |
| Pipe character | Separates the command from the tag name |
| p2p-account-tagname | Your line's tag |
| New line | The message text goes on the next line |
| Your message | The content the recipient will see |
The command must be at the very start of the message. No text before it. The command and message must be in the same message body.
Common Mistakes
These examples will NOT work:
- Hello! #switch|sales — Command not at start (must be first)
- #switch | sales Hello — Spaces around the pipe (no spaces allowed)
- #switch|sales(Hello) — No space before message content
Practical Use Cases
Sales → Support handoff:
#switch|p2p-account-support
Hello Sarah, our tech team will take it from here.
Manager check-in (without taking over the conversation):
#switch_unique|p2p-account-ceo
Hey, just checking in — how's everything going?
Automated routing via workflow:
Create a workflow with trigger Tag Added → route-to-closers, then use a Send SMS action with:
#switch|p2p-account-closers
Great news! Our pricing specialist will follow up shortly.Choosing the Right Method
| Scenario | Use |
|---|---|
| New lead should always reach the same salesperson | Tag — assign once via workflow |
| Manager sends a personal message, rep stays assigned | #switch_unique — one-time override |
| Lead is being transferred to a new team | #switch — permanent reassignment |
| New contact, no specific assignment needed | Default line — set in Lines view |
| Lead messaged you first on a specific number | Mirroring — automatic, no action needed |
Using Custom Values
GHL custom values work inside any message body — including messages with switch commands. WhatSnap receives the final, personalized text after GHL replaces the variables.
| Custom Value | Output |
|---|---|
{{contact.first_name}} | John |
{{contact.last_name}} | Smith |
{{contact.phone}} | +1234567890 |
{{appointment.start_time}} | 3:00 PM |
{{appointment.date}} | January 15, 2026 |
{{location.name}} | Smith Dental |
Custom values are replaced by GHL before the message reaches WhatSnap. Your devices send the final, personalized message.
Common Workflow Patterns
Lead Follow-Up Sequence
| Step | Action | Message |
|---|---|---|
| Trigger | Contact Created | — |
| Wait | 5 minutes | — |
| Send SMS | Welcome | Hi {{contact.first_name}}, thanks for reaching out! How can I help? |
| Wait | 1 day | — |
| If/Else | Did they reply? | — |
| Send SMS | Follow-up | Just checking in — any questions I can answer? |
Appointment Confirmation + Reminder
| Step | Action | Timing |
|---|---|---|
| Trigger | Appointment Scheduled | Immediate |
| Send SMS | Confirmation | Your appointment is booked for {{appointment.date}} at {{appointment.start_time}}. |
| Wait | Until 24 hours before | — |
| Send SMS | Reminder | Quick reminder: you're scheduled for tomorrow at {{appointment.start_time}}. |
Volume Considerations
Every message triggers a send from your physical device. For sustainable volume:
- Warm up new lines — Start with 10-20 messages/day, increase gradually. See Line Warm-Up.
- Safe daily range — 200-300 messages per line
- Use multiple lines — Split high-volume campaigns across lines using tags or switch commands
Skipping warm-up or exceeding limits will get your line flagged by carriers. P2P messaging requires patience.
Related
Last updated on October 15, 2026